
Pulse Monkeys
Completed in Late 2011, Pulse Monkeys features puppets, spacecraft and ecological disaster.
On the outer edge of known space, a lone cargo pilot discovers the remains
of an ancient and once great civilization.
On the outer edge of known space, a lone cargo pilot discovers the remains
of an ancient and once great civilization.
The Making Of...

A galactic voyager is diverted to investigate a signal anomaly from a watery world.
This logo is terrible!!! :-)
This logo is terrible!!! :-)
I think I might have a problem with "Pulsers". It looks like Pulsars but spelled wrong. Its about things (civilizations in this case) that emit pulses.
Edit, Its now called "Pulse Monkeys"
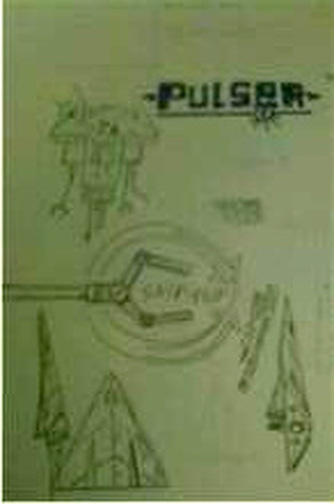
Incredibly bad scan of some concept sketches. Must have been bored in a meeting. Actually kind of strange, I can concentrate better on what somebody is saying when I'm doodling than not... I've heard other doodlers say the same thing.
So its got a giant pointy space ship and a some kind of probe, with a robot claw.
What could possibly go wrong?
So its got a giant pointy space ship and a some kind of probe, with a robot claw.
What could possibly go wrong?
Building the Space Trucker
The Space trucker puppet is made using latex rubber molding techniques. Monster Makers supply everything you need to do this and a really good book on how to do it. The materials are a bit messy but very low in toxicity.
Another great resource for this is the MoveFX Magazine Master Class Dvds. The Jordu Schell half mask tutorial on this disc is awesome.
I used the same techniques to make the monster in the church in As Daylight Dies. Its fun and easy to do.
Another great resource for this is the MoveFX Magazine Master Class Dvds. The Jordu Schell half mask tutorial on this disc is awesome.
I used the same techniques to make the monster in the church in As Daylight Dies. Its fun and easy to do.
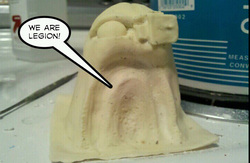
The "Space Trucker" Sculpt
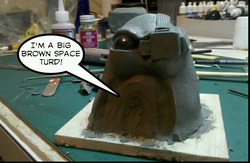
Head sculpted in wax clay. The eye is a glass marble which gives you an idea of scale. The head is about fist sized.
A White Hydrocal Mold
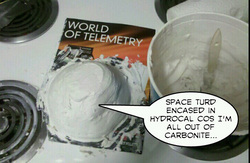
A Plaster mold. The Head is in there.
The only thing to remember about plaster is don't put it down the sink. Plaster in your plumbing would be BAD.
The only thing to remember about plaster is don't put it down the sink. Plaster in your plumbing would be BAD.
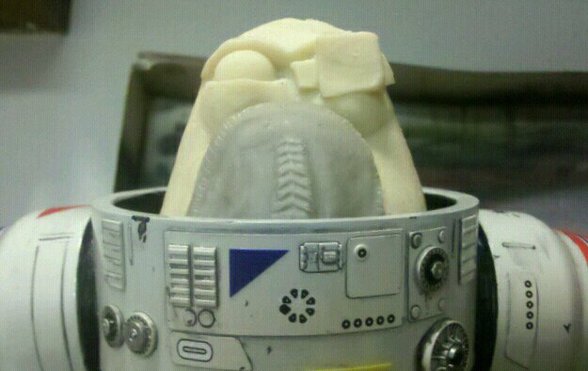
Mold Inner
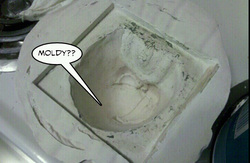
This is what the mold looks like once all of the clay is pulled out
First Casting
This first casting was a bit of a mess. The latex was too thick, easy fix for the second one I added a few drops of water.
Putting the Animatronics in place
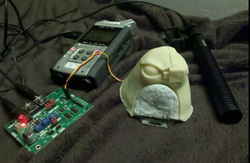
The head has an inner skill at the front made from plumbers epoxy.
A small rc servo is mounted to that.
A hinge was fabricated for the lower jaw sculpt.
The Cowlacious Scary Terry servo driver moves the jaw based on a line level sound input.
It actually works pretty well. The theory is, this will make the puppeting easier as I'll only have to deal with rotating the neck.
Next job, sculpt some texture on that lower jaw and start work on the space suit! The space suit is made from sewer pipe!
Here's the Cap before paint.
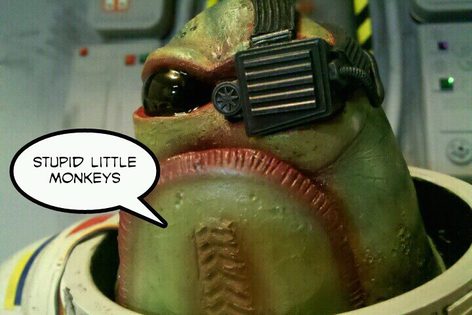
And here he is in all his final glory. The ship interior behind him is foamcore with a tupperware lid for a door and equipment boxes made from cassette boxes and altoids tins. Its all dressed up with labels and warning markers made with a color printer and stick on jewels from the toy shop.
On the cap you can see the organic forms came out great but that his head piece was a bit rounded so I ended up adding a cover from plastic sheet and adding details from kit parts.
On the cap you can see the organic forms came out great but that his head piece was a bit rounded so I ended up adding a cover from plastic sheet and adding details from kit parts.
I tried using a projector to light the Captain, but I couldn't get enough depth of field on the 5D so I had to add loads of fill light. The projection is in the final version but you have really have to look to see it.
Probe Droid (Unused)
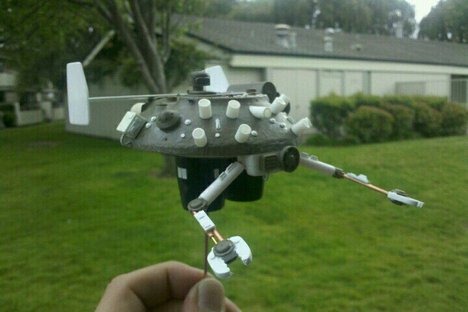
The original script called for a flying probe droid to investigate one of the abandoned cities. I got as far as shooting green screen footage of the probe before realizing it was superfluous to the script, but here is a work in progress pic anyway.
Its a 1/35 scale russian tank turret with detailing using plastic sheet and copper pipes.
Its a 1/35 scale russian tank turret with detailing using plastic sheet and copper pipes.
Probe Droid Test Shot
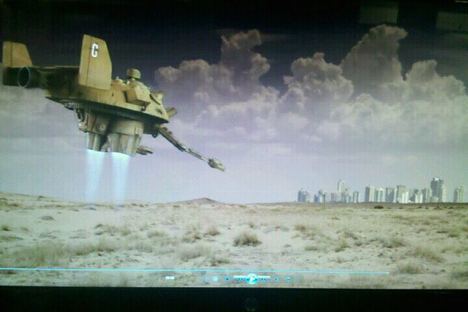
Screenshot taken with a cellphone of the green screened droid flying over some desert toward and abandoned city. The city is bits of skyline from Vancouver. The jet exhausts a blue jet effect from detonation films.
This stuff looked ok but definitely looked green screened...
This stuff looked ok but definitely looked green screened...
The Ship being built
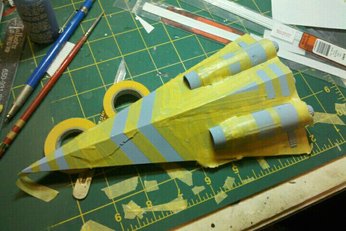
I wanted the ship to look like something from the cover of a seventies sci fi model. Chris Foss one of the masters of this style. His new book is available now and is a great resource for ship design.
Chris Foss' website
In this shot you can see the ship about halfway through paint. Its made from plastic sheet with model kit parts for details including the engines which come from a soviet bomber kit.
Chris Foss' website
In this shot you can see the ship about halfway through paint. Its made from plastic sheet with model kit parts for details including the engines which come from a soviet bomber kit.
Space, the final frontier...
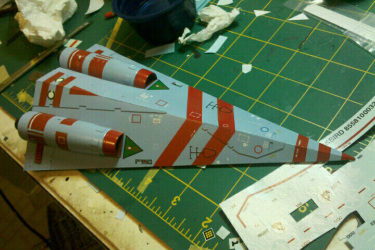
Putting the stickers on. Have to put a gloss coat on before they decals go on. After that, I weathered it down a bit. It is after all supposed to be the equivalent of a battered old big rig.
Animatics and Animations
Made a full length sound track with some video. Using this to help plan shots. Learning a lot about the structure of the story and how it will work from that. Working on updating lesabre2, the program I used to create all my graphic screens. Nearly done and then can go back to making content.
Need to get a better microphone.
Need to get a better microphone.
Stock Footage
So last weekend I went in search of a powerstation that I could use for a short scene in this project. I found I couldn't get close enough to get the images I want. Tonight I broke down and bought the shot on istockphoto. VIdeo is crazy expensive, but oth honestly if I figure gas and time into getting some decent factory pictures maybe this does make sense and as far as I can tell I don't have to credit istock. I also have images from nuclear training films which are out of copyright so I think those are ok and from nasa. I probably do need to credit nasa!! :-)
Post Mortem
So the biggest mistake I made on this project was I made the sound track first and I never checked to see if people could understand it. Made sense to me, but no to anyone else... so I ended up having to redo the audio twice. But also as part of this experience I realized that my testing policy wasn't working very well. Next time I will have a more formalized pre-screening and get some decent feedback before unleashing my work on the unsuspecting public....
I just watched it again after 3 months and I kind a like it. Its a bit heavy handed, I might have gone a different way with the computers voice, but it rattles right along and gets to its point.... on to the next one! :-)
I just watched it again after 3 months and I kind a like it. Its a bit heavy handed, I might have gone a different way with the computers voice, but it rattles right along and gets to its point.... on to the next one! :-)